Using the Be Happy Scrapbook Kit with Maggie Massey
Hello, hello, SC fans! Today I'd like to show you a little closer look at how one of my layouts from the "Be Happy" Gallery came together.

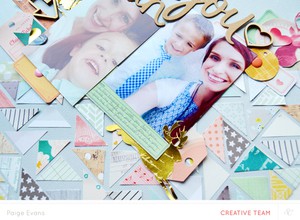
I'm a HUGE fan of color and pattern, but you may not guess that from my ever-present mostly white backgrounds. I really do love bright, bold colors and design—especially dots and stripes! I just don't love it EVERYWHERE on my page. So I tend to use those things sparingly on my layouts, opting to keep my photo the main focus of my pages.
When I get a kit that is so full of fun pattern and color (like "Be Happy"), I want to make sure I include as much as I can without letting my layout get crazy overwhelming and busy. One way I like to do this is by adding thin strips of my favorite paper designs as a background to my photo.

For this page, I did just that. I cut my strips fairly randomly and added them to my page. I've done this same technique with uniform strips of paper, too, but I love the bit of whimsy the different sizes add to this little boy layout.

After placing my photo on top of my paper strip background, I completed my page by adding a few little embellishments. You'll see that I kept most of my die-cuts and chipboard stickers on the left side of my page. I think the eye is naturally drawn that way because it's the way my son is pointing in the photo.
I love the way this really simple layout turned out...and it came together in very little time! For me, that's a definite win!

Shop This Post


Sign in or sign up to comment.
0 comments